Wall Configuration, Ultimaker Cura in Spanish

Wall settings in Cura provide the ability to make adjustments to wall thickness, number and printing sequence, as well as fill gaps between walls, print thin walls, modify horizontal expansion, and select seam placement, among other options.
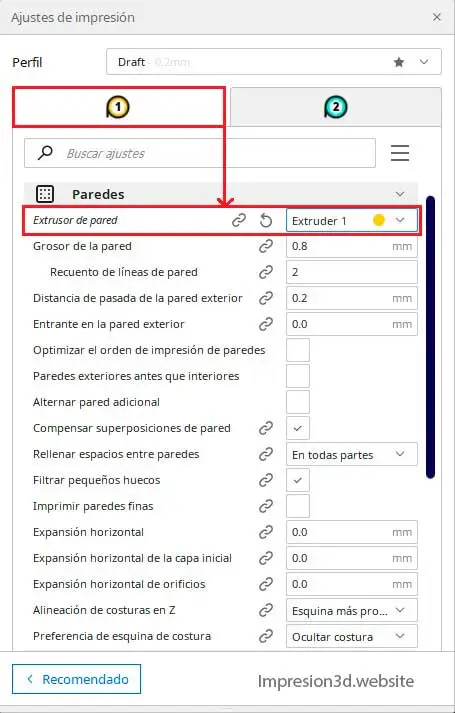
wall extruder
This setup is used with 3D printers that have a dual extrusion system, It is used to define which of the extruders should print the walls.
If your printer does not have a dual extrusion system, This setting will remain hidden, unless the number of extruders is changed in the printer settings.
wall thickness
This setting adjusts the thickness in millimeters of the walls. Cura rounds the thickness in relation to the line width, Always based on the nozzle size.

A wall thickness of 2 or 3 times the line width (the nozzle size) may be adequate.
If the line width is 04mm the amount in millimeters for 2 walls would be 08mm, and for 3 walls it would be 1.2mm. (This will be automatically multiplied by Cura when you select the number of walls.)
- A printed model with more walls will be stronger and reduce the chance of leaks.
- A model printed with fewer walls can reduce printing times and the amount of filament (but it would be more fragile)
Wall Line Count
You can also choose to enter the number of walls you want in the «wall line count» field. This is the easiest option—just enter the number of walls you want, and you're done.
When you set the wall line count, the wall thickness in millimeters will be automatically calculated by Cura.
Minimum number of walls recommended: 2 walls
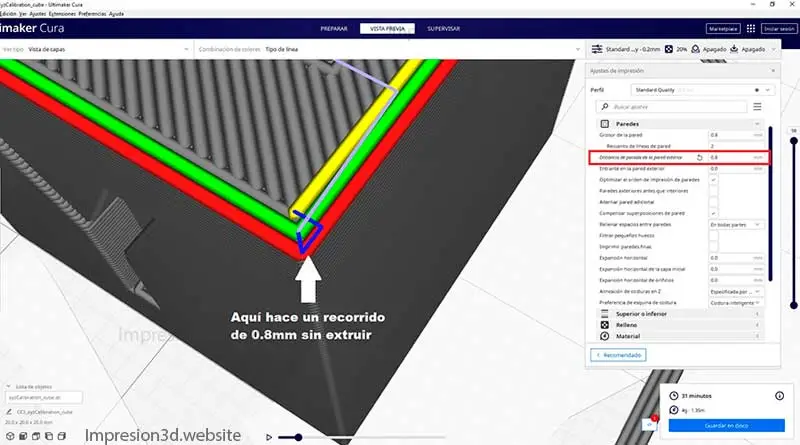
Outside wall pass distance
When you finish making an exterior wall does an extra path without extrudingThis serves to reduce a bit of the seam when the nozzle moves from an outer wall to other parts of the 3D print.
Outer wall recess
It serves to compensate for the position of the exterior wall, In the event that the configured line width is less than the nozzle width.

For example: A 0.75 line width with a 0.80mm nozzle leaves a 0.05mm gap on both sides of the printed line.
Then an offset of 0.025 should be set to balance the outer part.
Recommendation: Always set the line width (in the quality section) to be equal to the nozzle size.
Exterior walls before interior ones
It is used to choose which walls to print first, the exterior or interior walls.

When selected the exterior walls will be printed first, the dimensions will be more accurate but the quality of the overhang may decrease.
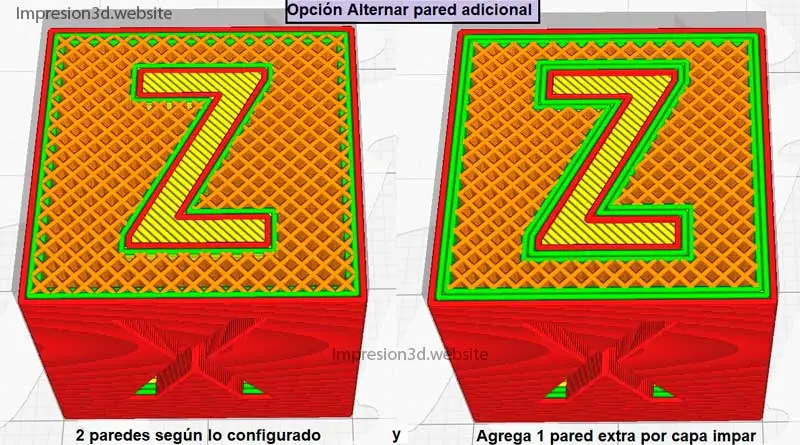
Toggle additional wall
Add an extra wall every two layers. In this way, «the filling is enclosed within the walls,» creating a stronger impression.

If you set wall lines to 2 walls and enable an additional wall, they will print 2 walls on even layers and 3 walls on odd layers.
Offset Wall Overlaps
It is used to reduce extrusion when the nozzle has to pass twice over a narrow area.. In this way the walls are printed without the part being overextruded.
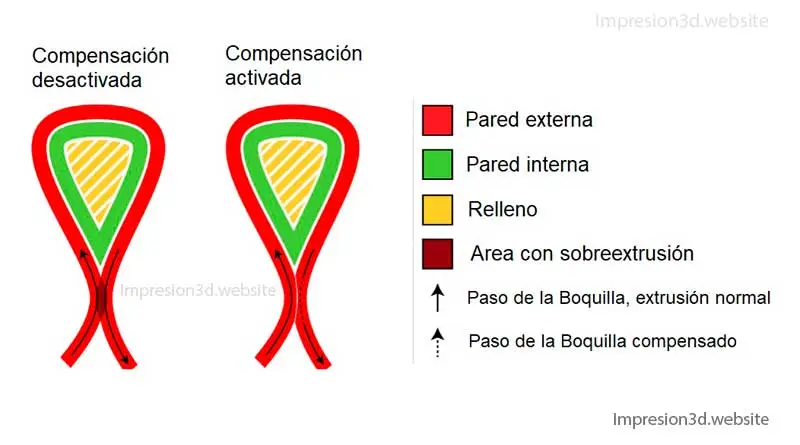
This setting can be enabled for both exterior and interior walls.
Fill spaces between walls
When printing lines thinner than the nozzle size, unfilled spaces may remain between walls. This can happen between exterior and interior walls where the model ends at corners.
This option It serves to fill those spaces between walls, the spaces left after printing the walls.
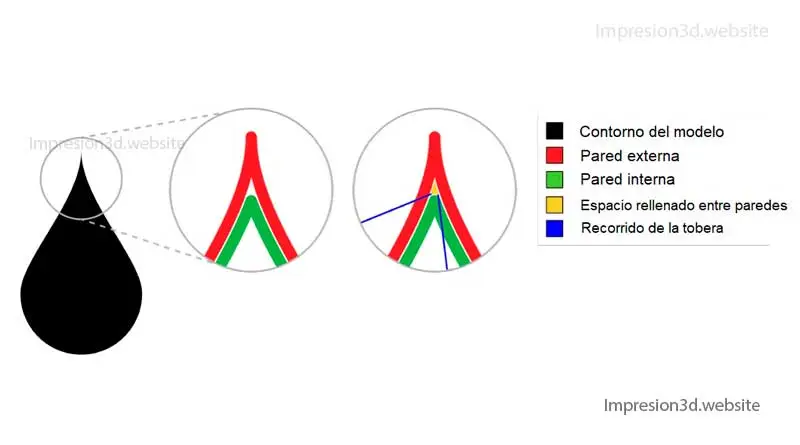
Notice how the space fill option affects the movements of the path. The printer has to come back to fill in those empty spaces..
Filter small gaps
Some spaces are so small that due to travel, time, and additional extrusion, they are not worth being stuffed.
You can also enable this feature to fill in those gaps, if you really feel it is necessary.
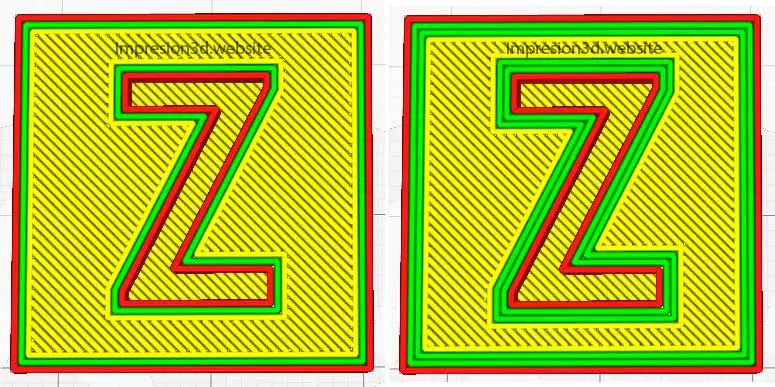
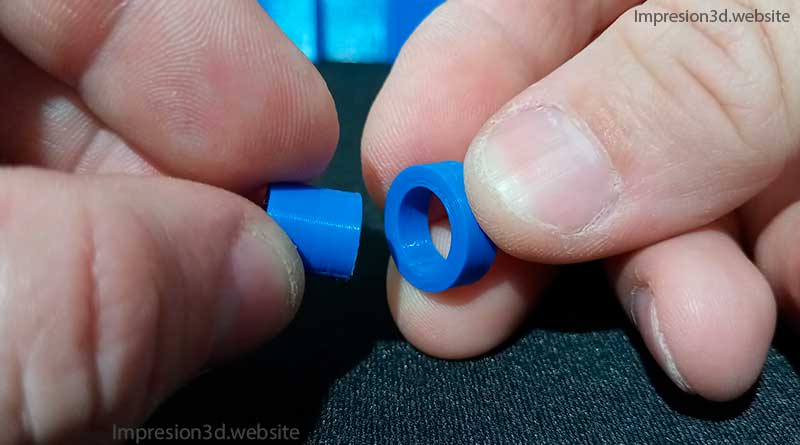
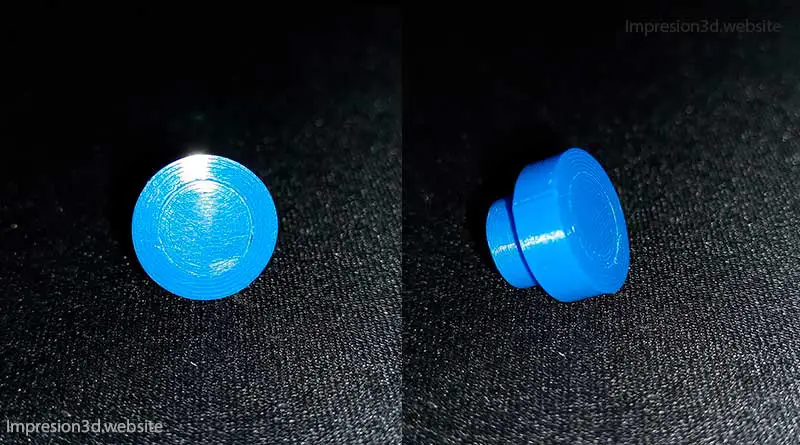
print thin walls

This option is used to print walls thinner than the nozzle size.
The lines may still be over-extruded, but at least they won't be completely removed.
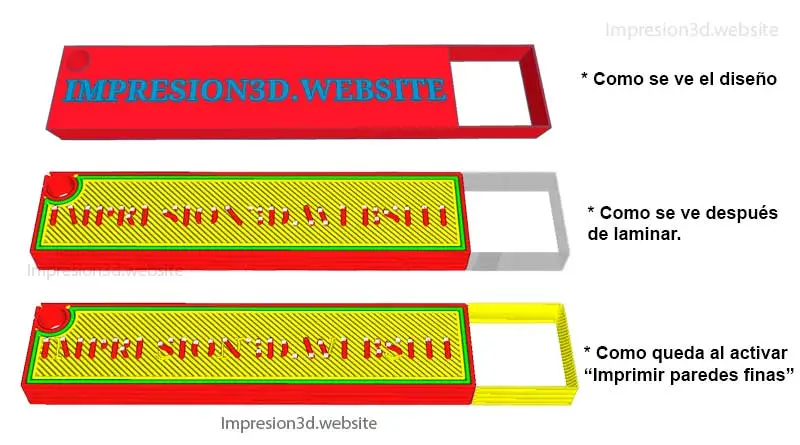
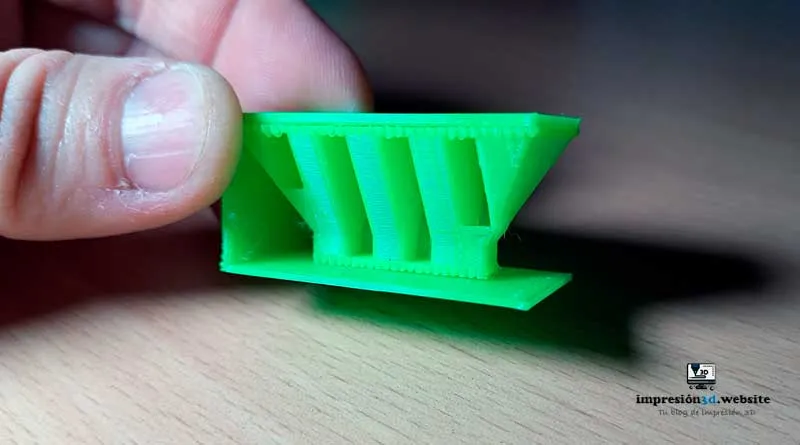
Sometimes what we see on the design table isn't the same as what we see in Cura; sometimes certain walls just «disappear.».
In the example above the walls on the right disappear, this can be solved in 3 ways:
- Enabling the option to print thin walls, being able to recover the walls (but perhaps some details are lost).
- Changing the nozzle to a smaller one. This can help to recover the walls and the details (but it will surely increase the times).
- Back to the drawing boardSometimes there is no other option than to solve a problem at its source.
It is important to understand that when designing for 3D printing, some details must be taken into account.
And it is that Creating a 3D design with thinner walls than a nozzle can print can lead to problems.
Horizontal expansion
Horizontal expansion may be necessary where tolerances are important.
When pieces need to fit together and they don't, it is because the dimensions of the 3D printed model do not correspond to those of the designed model.
This may be due to deformation of the plastics when printing at high temperatures, or an uncalibrated extruder flow.
Enabling horizontal expansion can compensate for these differences in object dimensions.
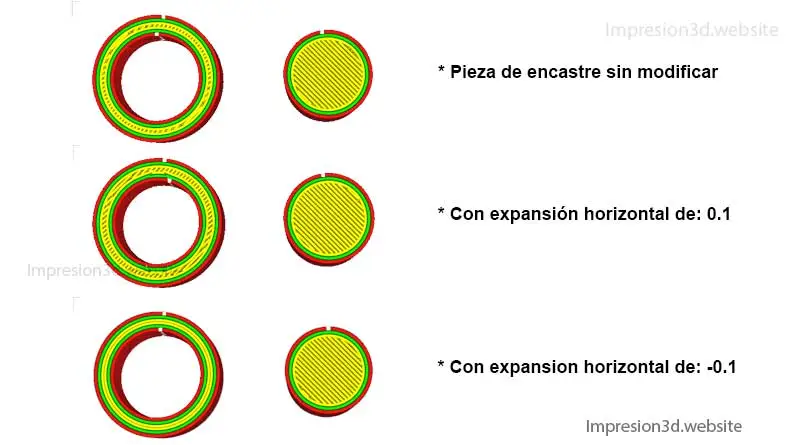
A positive value will increase the size of the model lines, while a negative value will decrease it.
This is used to modify the line width when pieces that should fit together do not fit.
Horizontal expansion of the initial layer
This feature has exactly the same effect as horizontal expansion, but only applies to the first layer.
This can help in the first layer, increasing dimensional accuracy.
Horizontal hole expansion
This feature has the same effect as horizontal expansion, only it applies to closed holes in the X,Y plane of each layer, and not on the outside of the model.
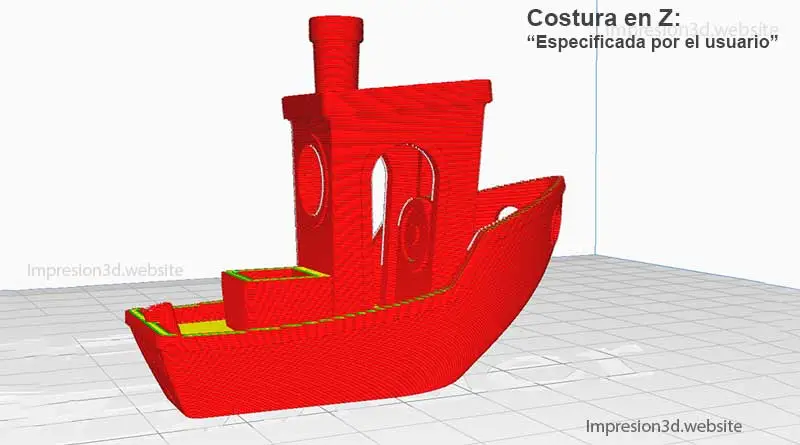
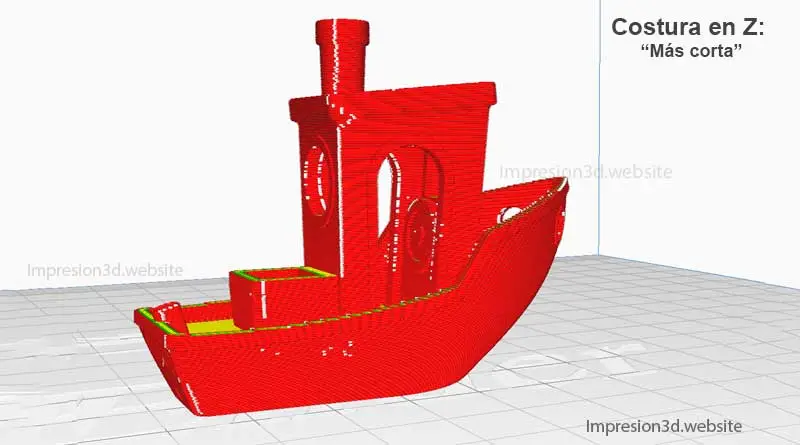
Z-stitch alignment
This configuration allows you to choose where the extruder will start each layer (in the Z direction) and modify the position of the seam in the model.
Changing the alignment of the Z seam may make the seam less noticeable.
The available options are:
- User Specified: Sets a Z coordinate of the seam. In this case the orientation of the piece is important., because depending on how it is positioned on the base you can choose which is the back, left or right, or which is the front, left or right.
- Shorter: the next layer starts at the end point of the previous one. This way is faster, but the seam will be more visible.
- random: The layer starts randomly. The printing time will be longer due to the necessary displacement movements.

- Sharpest corner: Place the seam on the sharpest corner, either inward or outward, of the pattern. This procedure is the most effective for better hiding the seam.

Seam Corner Preference
For some projects it may be necessary to expose the seam for post-processing of the print.
To do so you can adjust the following settings:
- None: The seam will be held in the seam alignment position on the Z axis.
- Hide seam: This will work to hide the seam as much as possible.
- Show seam: The seam will be exposed as much as possible.
- Hide or show: The seam will be hidden when possible and exposed when there is no other option.
- Smart Stitch: Allows stitching in both corners, but more often opts for inside corners if appropriate.
See also: «How to hide seams in Cura«
Video on Youtube: RD Studio
Continue reading about: «Layer height, Ultimaker Cura in Spanish«

Hi, I'm a total novice
Mind these aids are super good. all the best
Good morning Jose! Thank you for your comment, I am very glad to be of help!