
Cura Support configurations

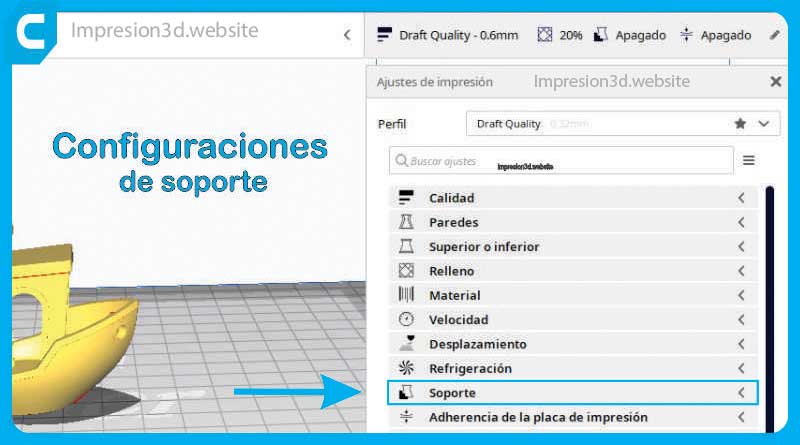
When it comes to printing complex 3D models, supports are an essential part of the process. In Ultimaker Cura, you can customize and adjust a wide variety of media settings to get the best results from your prints.
The support configurations in Cura are used to generate structures that can support parts of the model that have overhangs.
Without these structures, the parts would break during printing.
Generate Support
The first step to configure the supports in Cura is enable support generation. This feature allows the program to identify areas of the model that require supports to print correctly.
This option is found in the "Support" tab of the print settings. By activating this function, Cura will analyze the model and automatically generate the necessary supports to maintain the protruding parts during printing.
In these cases, printing a support structure below the model will prevent the plastic from falling off. This can be achieved by enabling “Generate Support”.
stand extruder
Dual extrusion 3D printers provide the ability to create water soluble supports, which is a very useful feature.
This feature allows you to define which parts of the support will be printed using each extruder, giving you more control over the printing process.
This setting will only be visible if you have a 3D printer with a dual extrusion system in Ultimaker Cure.
This allows you to use a water soluble material on one of the extruders, while the other extruder is used to print the main model. This way, once the print is finished, you can submerge the object in water and the soluble supports will dissolve easily, leaving the main model intact.
The "Support Extruder" settings are divided into:
- Support Filler Extruder: Specifies which extruder will be used to print the support fill material in a 3D print.
- First Layer Support Extruder: Determines which extruder will be used to print the first support layer, which is the foundation on which the rest of the support structure will be built.
- support interface extruder: Indicates which extruder will be used to print the support interface, which is the closest layer to the model and helps provide a smoother, easier to remove support surface.
- Support Roof Extruder: Specifies which extruder will be used to print the support roof, which is the top of the support structures and provides a solid support surface for the top layers of the model.
- Support soil extruder: Determines which extruder will be used to print the support floor, which is the base of the support structures and provides stability to the model during printing.

Support structure
The support structure determines how the supports will be built in relation to the main model.
Ultimaker Cura offers two types of support called «Normal" and "Tree«.
normal support
When you activate Normal support in Cura, the software analyzes the model layout and determines the areas that require additional support to avoid warping or collapsing during printing.
Cura then automatically generates support structures that attach to the print base and support the projecting or overhanging parts of the model.
'Normal' support generates supports directly below your 3D model and is used by default in all Ultimaker print profiles.
One of the main advantages of Normal support is its convenience and ease of use. Being an automatic feature, there is no need to make manual adjustments or customize support parameters.
Cura is responsible for generating the necessary structures in an optimal way, saving time and effort in configuration.
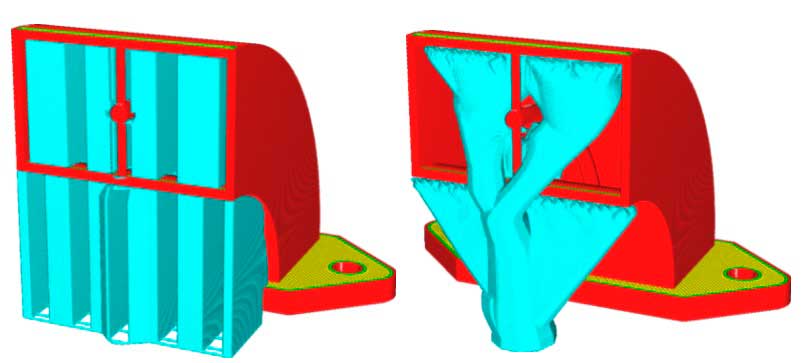
Alternatively, the "Tree" bracket creates branches that grow around the 3D model. The benefits of this alternative include reduced impression time and less scarring on the model.
tree stand
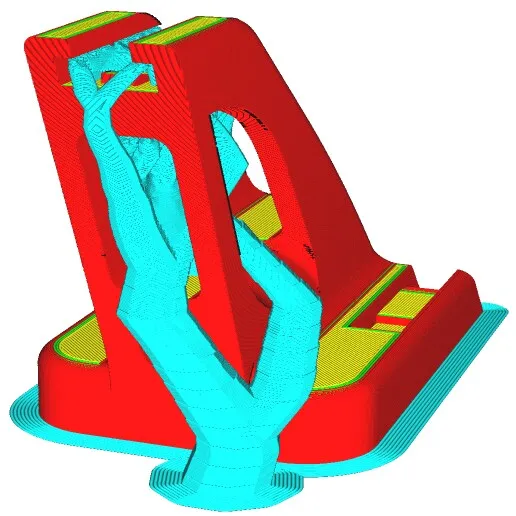
Tree support is a very useful feature in Cura that allows you to generate specific support structures for models with complex geometry or difficult to print overhangs.
This feature uses a branching approach to create a more efficient and easier to remove support.
Tree support is based on a hierarchical structure, similar to a tree, where branches are generated that branch off from a main trunk.
These branches are strategically placed to provide stability to the printed model while minimizing the amount of support material required.
Here, you can configure the following parameters:
- «branch angle» that controls the maximum inclination of the branches of the support
- «branch diameter» affecting the width of individual branches
- «trunk diameter» that determines the thickness of the main trunk of the support.
- «Branch diameter angle» to control the inclination of the finer branches.
Stand placement
You can set "touching print bed" either "everywhere«. When set to everywhere the support structures will also print resting on the model.
Contains the following options:
- Touching the plate: Cura only places the support in contact with the printing surface.
- Everywhere: It allows the generation of support in any place where it is necessary, also supporting the model.
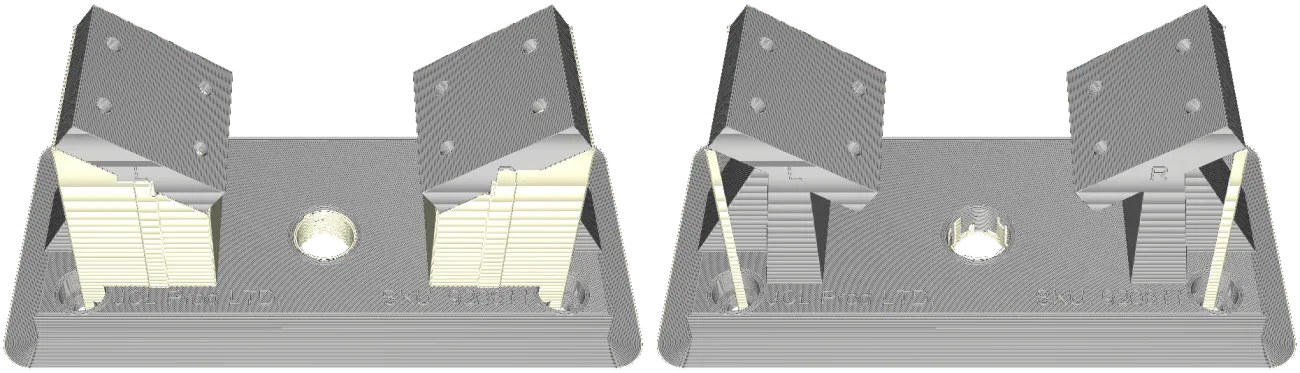
The choice between these two support placement options in Cura depends on several factors, such as the geometry of the model, the required stability and the ease of subsequent removal.
Sometimes you do not want the support to rest on your model so as not to spoil it with "unnecessary scars". Other times, you will have no choice but to activate "everywhere" so that the printing does not fail.
Bracket cantilever angle
The support overhang angle is a key parameter in support setups in Cura.
This setting determines the maximum angle at which support will be generated for overhangs and projecting areas of the model.
For example, if you set a support overhang angle to 45 degrees, Cura will generate support for any overhangs that exceed this angle, ensuring these areas print correctly.
It's important to find the right angle for each print, as too low an overhang angle can create unnecessary support in areas where it's not needed, which can increase print time and material consumption.
On the other hand, too high a cantilever angle can cause the necessary support to be omitted, which can result in deformations or collapses of the model.
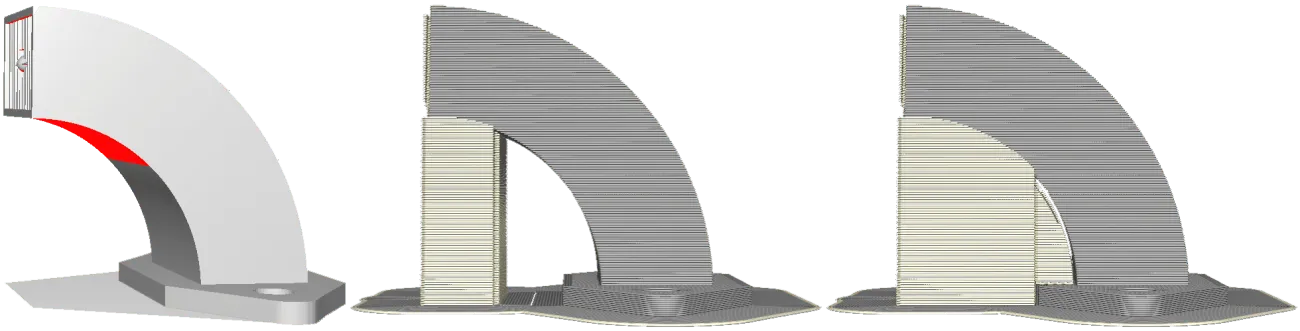
The red parts indicate the area that needs support. The middle model has a 70° overhang angle, while the right model has a 45° overhang angle
To determine the proper bracket overhang angle, consider printing a overhang test.
Bracket pattern
Support pattern refers to the design and arrangement of support lines that will be generated during printing. Cura offers different pattern options that will affect both the stability of the support and the ease of removal.
It refers to the pattern that the support structures are going to follow, resulting in a strong support or, on the other hand, easy to remove.
You can choose between the following patterns:
- Zig Zag
- Lines
- Rack
- triangles
- Concentric
- Cross
- gyroid

Support wall line count
Support wall line count refers to the number of support lines that will be printed to form the support structure. This setting directly affects the stability of the support and the amount of material used in the print.
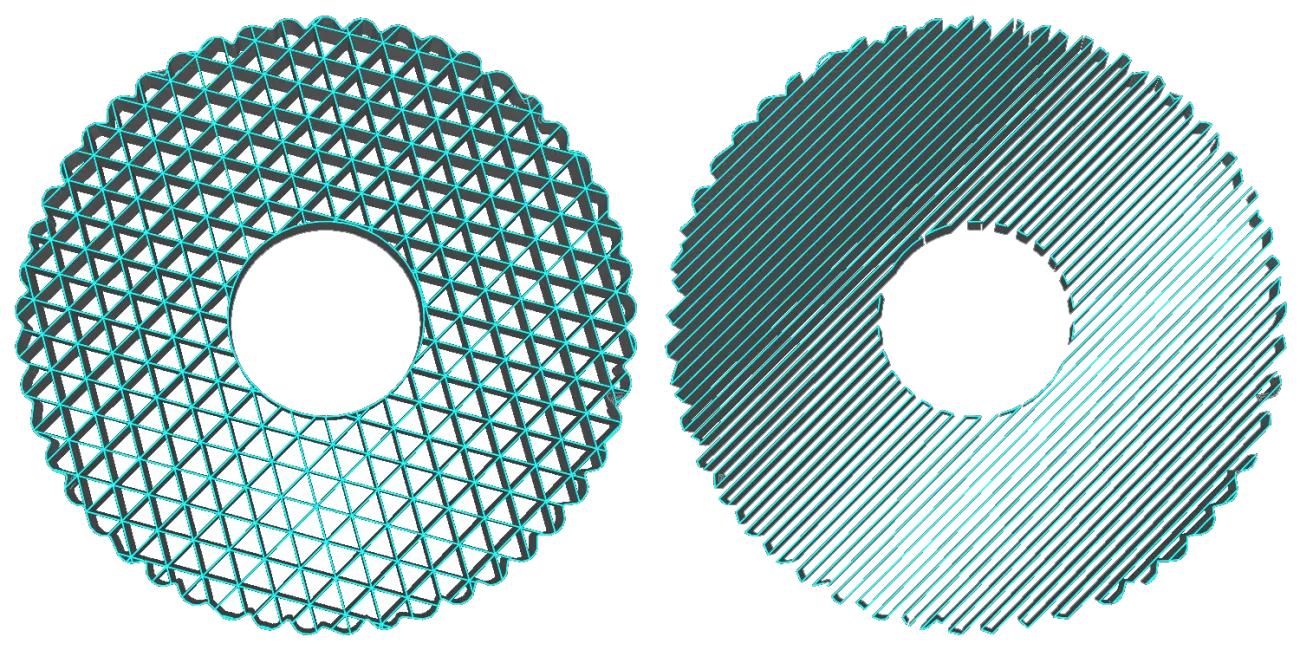
Connect support zig-zags
The “Connect support zig-zags” option in Cura allows you to join support lines in a zig-zag fashion to create a stronger and more cohesive structure. This feature improves media stability by preventing lines from separating or breaking during printing.
When you enable the "Connect support zig-zags" feature in Cura, zigzag support lines connect to each other, creating a more resistant structure.
This helps improve the stability and strength of the support, especially in areas with overhangs or complex geometries.
Support density
The support density determines the amount of material used to generate the support structures during 3D printing.
When adjusting the support density in Cura, you can control the amount of material used to create the support structures.
A higher density will create a stronger and stronger support, since there will be more material to support the protruding or projecting parts of the model. On the other hand, a lower density will reduce the amount of material used, which can result in a lighter but potentially less strong support.
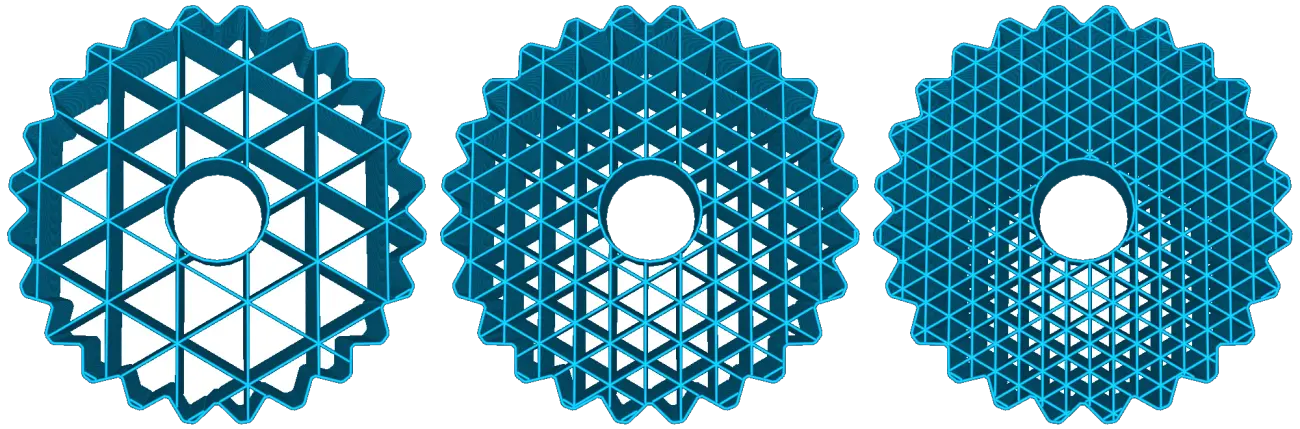
Support line distance
Support line distance is a secondary setting of support density; instead of calculating it as a percentage, it allows you to directly set the distance between supports. This setting can be adjusted separately for the first layer.
Support fill line direction
Support fill line direction refers to the orientation of lines generated within support structures during 3D printing.
For example, if you have a model with steep overhangs, it's a good idea to adjust the support fill line direction so that the lines are generated perpendicular to the overhang direction. This will provide a more robust and resistant support, avoiding deformation or collapse during printing.

Enable support edge
When the “Enable Support Edge” feature is activated, Cura creates an additional layer around the edge of the support, strengthening its connection to the model.
Just as you can put borders around the model, you can also do it with the supports.
The support edge adds a series of concentric layers to the inside of the support structure on the initial layer, similar to the model edge.
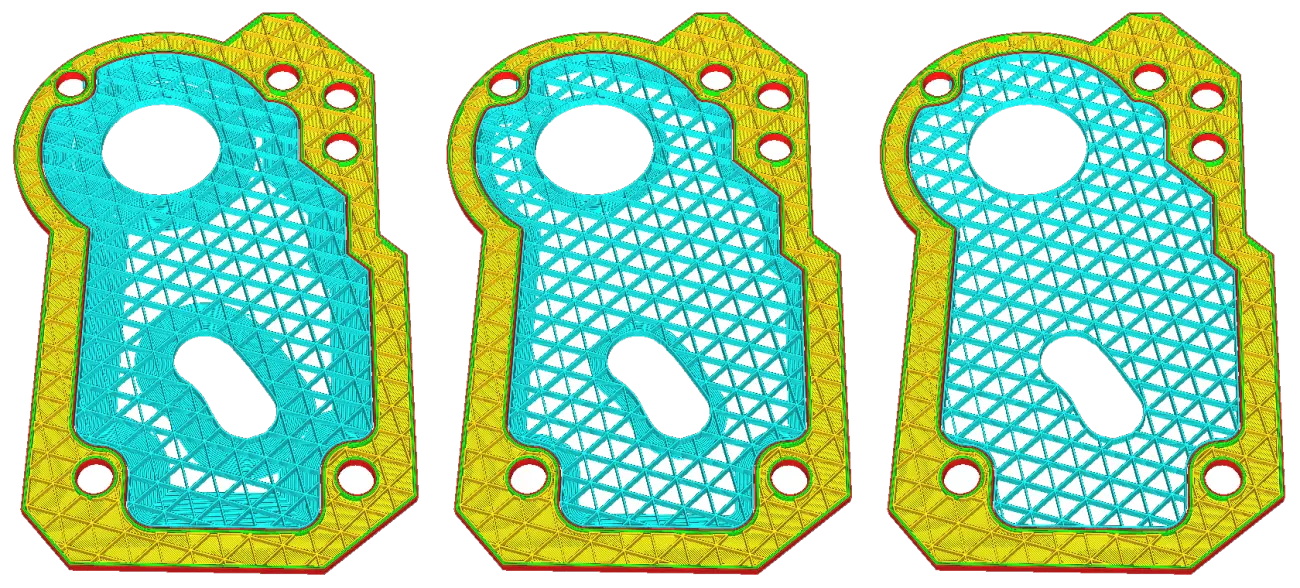
You can choose to modify the “Support Border Width”, and the “Support Border Line Count”
It is important to consider that enabling the support edge can slightly increase print time and material consumption, since an additional layer is added. However, the benefits in terms of stability and print quality often outweigh these aspects.
Support edge width
Support edge width in Cura refers to the setting that determines the size or thickness of the edge generated around support structures during 3D printing.
This edge provides additional support and helps maintain the stability of the model during the printing process.
A larger rim width will result in a wider, stronger support structure, which can be beneficial for models with larger or heavier areas that require additional support to prevent warping or sagging.
On the other hand, a smaller rim width will create a slimmer, more discreet support structure, which may be suitable for smaller models or models with more delicate features.
Distance in Z of the support
Support Z Distance refers to the vertical separation between the model and the support base during 3D printing.
This setting in Cura allows you to control the height or space that is created between the model and the support in the Z axis.
Increasing the Z distance of the support increases the space between the model and the support base. On the other hand, by reducing the distance in Z of the support, the space between the model and the support base is reduced.
Too small a distance in Z can result in excessive adhesion between the model and the support, which will make it difficult to remove the support and may leave unwanted marks on the surface of the model.

A small distance is necessary between the support structure and the model parts to easily remove the supports after the model has been printed. A low value creates a smoother surface, but can also make it more difficult to remove support properly.
X/Y distance of support
This setting in Cura allows you to control the space or distance in the X and Y axes between the model and the support. By adjusting this distance, you determine how close or how far apart the model is from the supporting structures.
The support X/Y distance refers to the horizontal separation between the model and the support structures generated during 3D printing.
Increasing the X/Y distance of the support results in a greater space between the model and the support structures. This can be useful in cases where it is desired to reduce the contact between the model and the support, thus facilitating its subsequent removal.
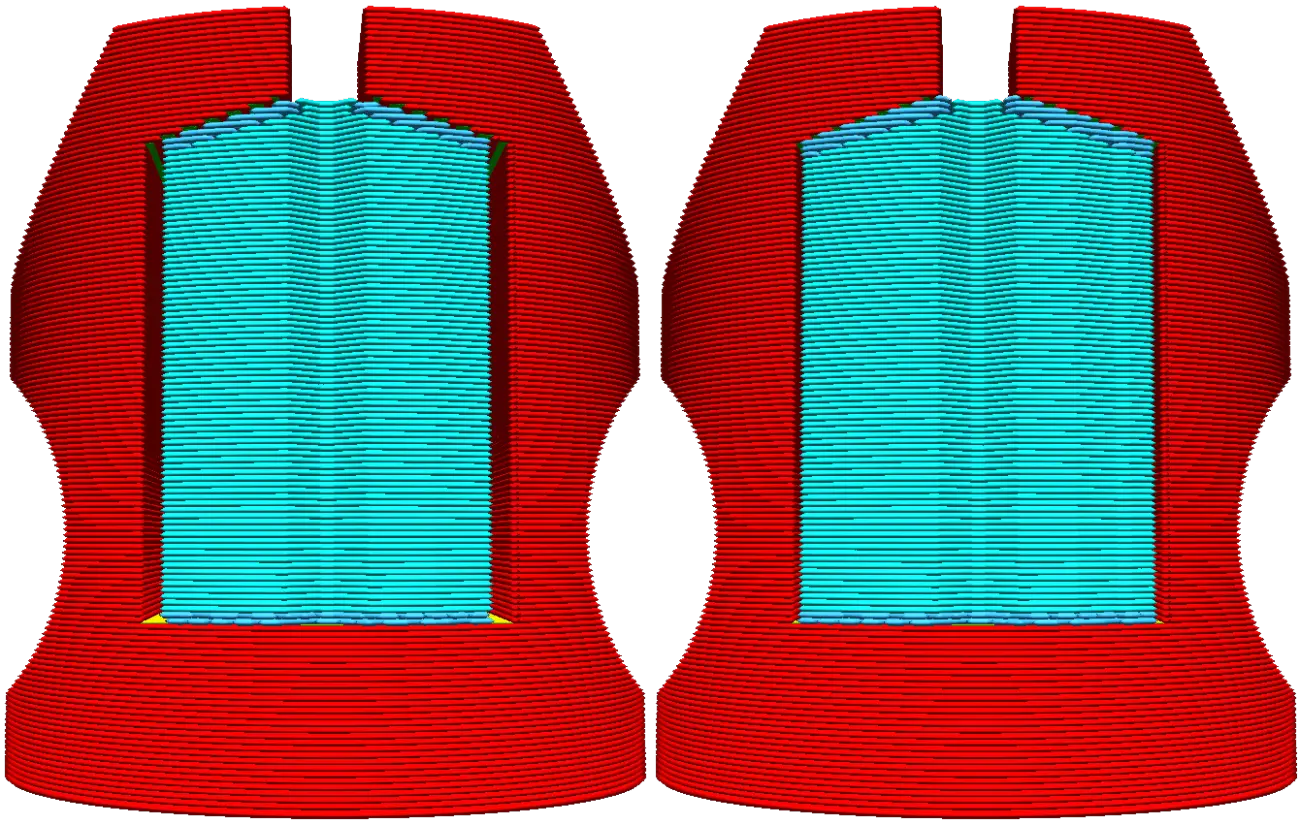
On the other hand, reducing the X/Y distance of the support means that the support structures will be closer to the model. Too small an X/Y distance can result in excessive adhesion between the model and the support, making removal difficult and potentially leaving unwanted marks on the model surface.
Priority of support distances
The support distance priority in Cura refers to the setting that determines which distance will be considered first when generating the support structures during 3D printing.
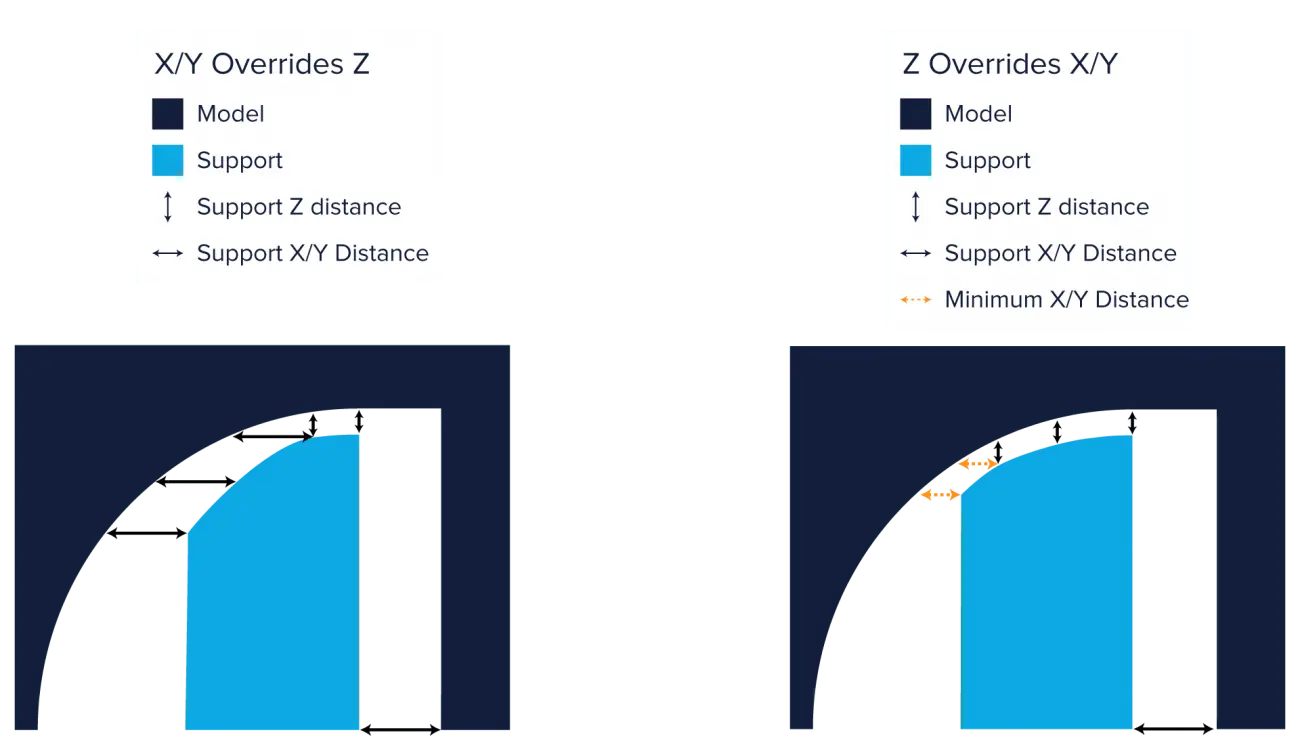
This option allows you to set whether the X/Y distance or the Z distance will take precedence when determining the location and spacing of the support in relation to the model.
For example, if you set a priority on distance X, the software will give more importance to the horizontal separation between the model and the support, adjusting the structures according to that distance.
On the other hand, if you choose a priority on distance Y, the software will focus on the vertical separation between the model and the support, generating support structures that maintain that specific distance.
Minimum support distance X/Y
(This setting will only become visible when the "Z on X/Y" option is chosen)
When Z overrides the X/Y distance priority, as mentioned above, the X/Y distance can force the support to stick to the model. By setting a minimum support X/Y distance, you can make sure there is enough space between the model and the supporting structures, avoiding collisions or unwanted interference.
The minimum support distance X/Y in Cura refers to the setting that determines the minimum separation allowed between the support structures and the model in the X and Y axes during 3D printing.
Adjusting the minimum support distance X/Y allows you to use the support priority in Z, but being able to set a minimum distance between the walls of the model and the supports of the print, to ensure that the support don't stick to the walls.
Stand Ladder Step Height
When "Everywhere" is chosen, the support is printed with the model. This support does not necessarily follow the contours of the model smoothly. Instead, the lower part of the support structure consists of small steps in the form of a ladder.
A low value will result in a softer base of support and more connections between the model and the support structure. A higher value makes it easier to remove the support later.
This option allows you to control the height of each step in the generated ladder structure to support the model during 3D printing.
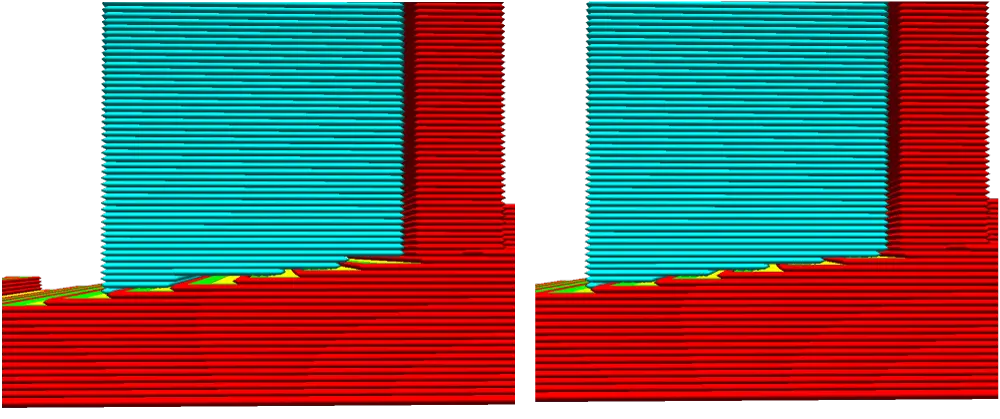
Adjusting the step height of the bracket ladder is important to tailor the bracket to the specific needs of each model. A higher step height will result in a more vertically spaced support structure, which can be useful for models with complex areas that require more solid and stable support.
On the other hand, a lower step height will create a denser and more compact structure, which may be suitable for simpler models or with more delicate features.
Maximum width of the step of the support ladder
The maximum width of the step of the support ladder in Cura refers to the setting that determines the horizontal distance between the different levels or steps of the generated ladder-shaped support structures to support the model during 3D printing.
This option allows you to control the width of each step on the support structure.
Adjusting the maximum width of the support ladder step is essential to adapt the support to the specific needs of each model. A larger step width will result in a more horizontally spaced support structure, which can be useful for models with complex areas that require stronger, more stable support. On the other hand, a smaller step width will create a denser and more compact structure, which may be suitable for simpler models or with more delicate features.
Minimum angle of slope of the support ladder step
Cura support ladder step minimum slope angle refers to the setting that determines the minimum allowed degree of inclination or slope for the steps of ladder-shaped support structures generated during 3D printing.
This option allows you to control the inclination of each step on the support structure.
With this setting, you can disable the steps at the bottom of the support, until the slope of the model has a certain angle.
For those cases, you can limit the stair steps to occur only on the steepest slopes. This setting decides what constitutes a "steep" slope in that sense.
Bracket joint distance
This distance controls how close the support structures are to the parent object and allows the support material to be more firmly attached to the model. Adjusting the support attachment distance is important to balance the stability of the model and the ease of removal of the support after printing is complete.
The support bond distance in Cura refers to the setting that determines the separation or gap between the support structures and the printed model.
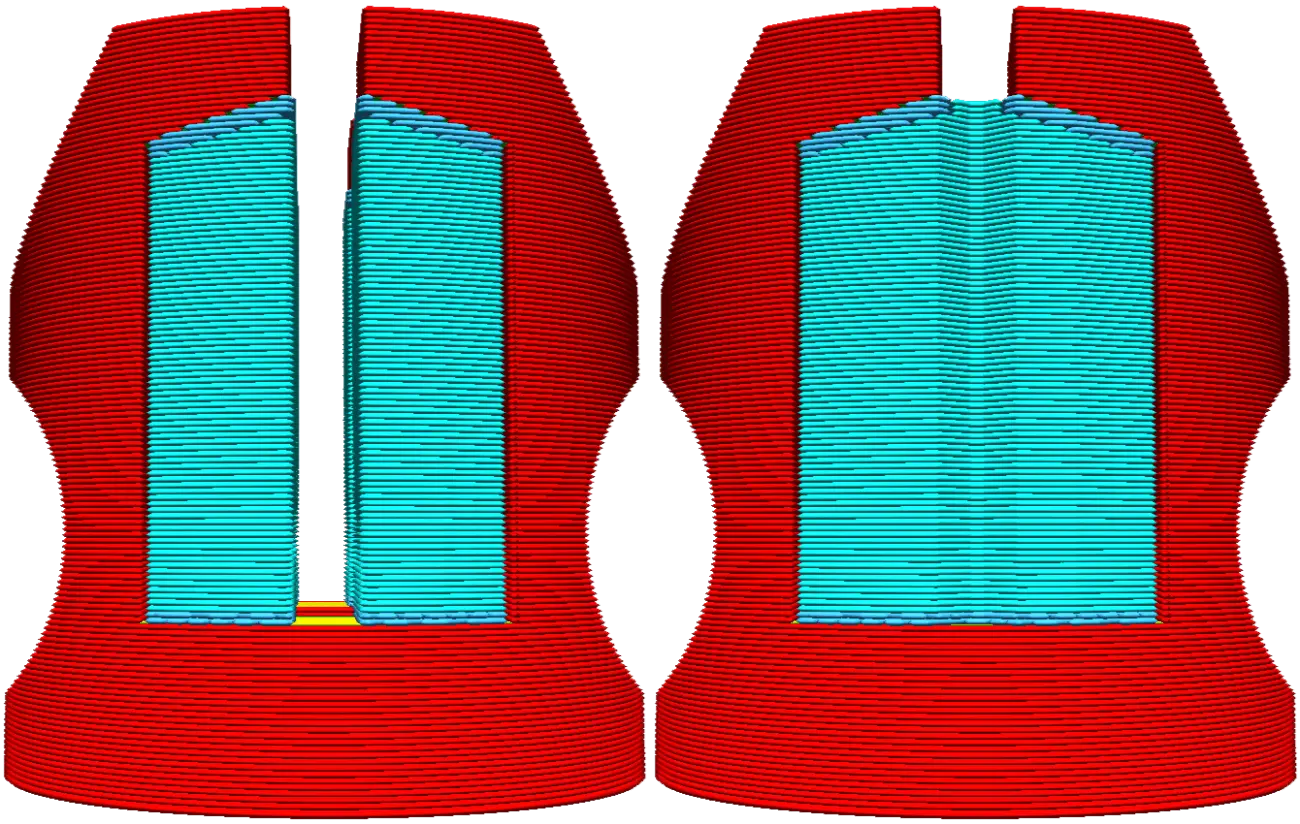
Increasing the support attachment distance will create a greater separation between the model and the support structures, which will facilitate their removal. This setting is especially useful when you want to minimize any marks or warping on the surface of the printed object.
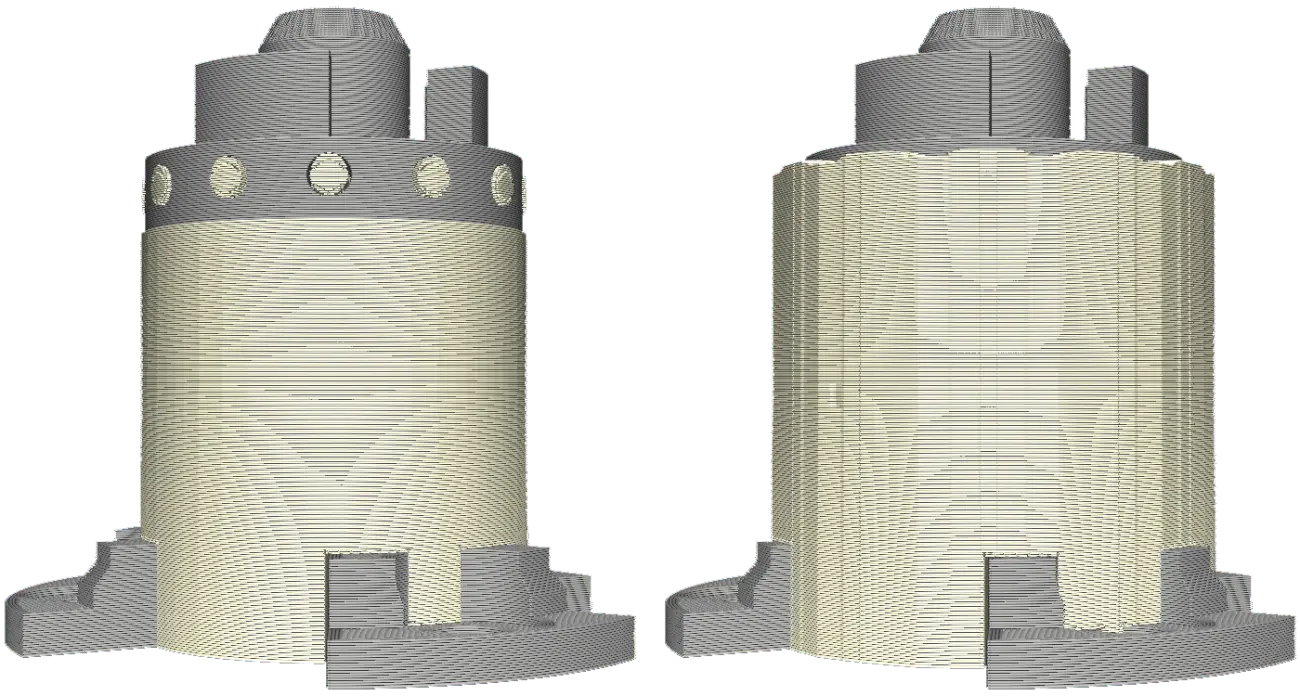
Bracket Horizontal Expansion
Support horizontal expansion in Cura refers to the setting that determines the horizontal expansion or extension of the support structures generated around the model during 3D printing.
This option allows you to control how far the support structures extend from the edges of the model, providing additional support and improving stability while printing.
Support infill layer thickness
The support infill layer thickness in Cura refers to the setting that determines the thickness of the support material layer that is generated within the support structures.
This option allows you to control the thickness of the support layers that are placed inside the structures to provide stability and strength to the model during printing.

This setting can be used to save time printing supports. For example if you are printing with a layer height of 0.2mm you can change this setting to 0.4mm so that every two layers of the model print one of the support.
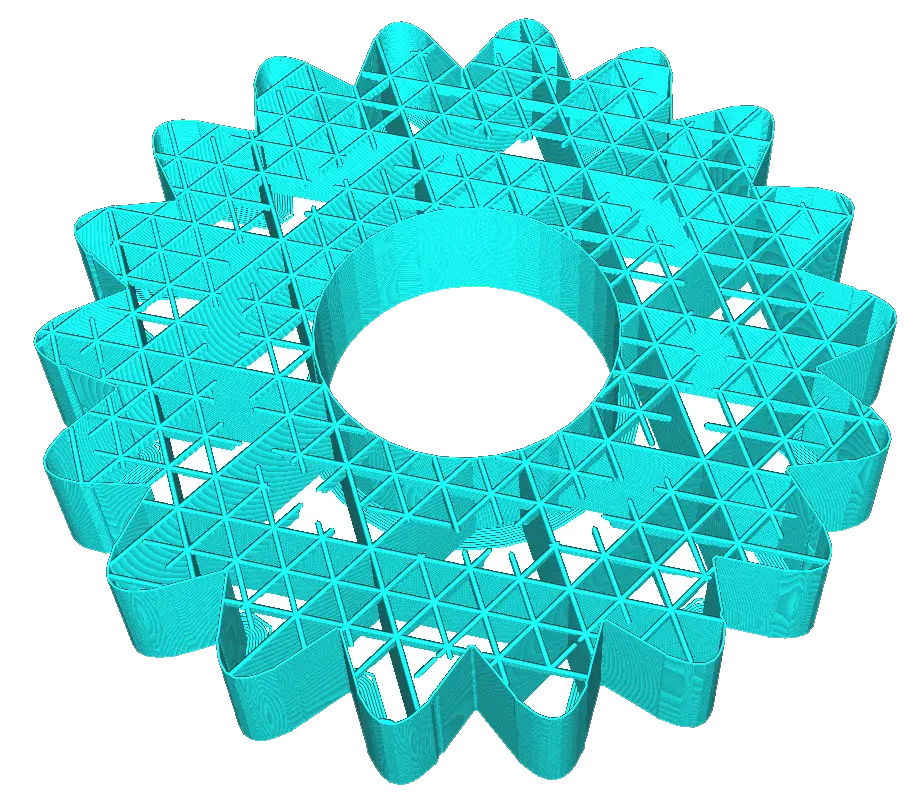
Support filler steps
It is the number of times required to halve the density of the support fill as it moves away from the top surfaces.
The areas closest to the upper surfaces have a higher density, up to the support fill density.
Minimum support area
This option allows you to specify the surface threshold of the object that should be covered by the support. If the area of a section of the model is less than the set value, no support will be generated in that region.
This setting sets the minimum size required to generate support structures around the model.
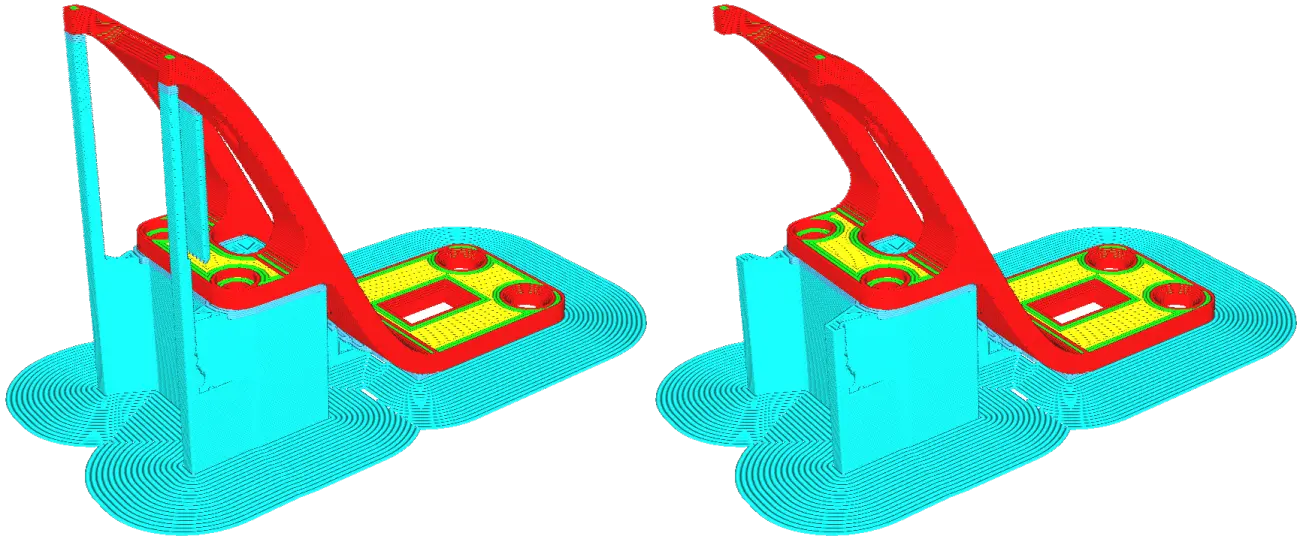
Adjusting the area of the minimum support is useful to avoid the unnecessary generation of support structures in small areas or in parts of the model that do not require it. This saves material and print time, while ensuring supports are only placed where they are really needed to maintain print quality and stability.
Enable support interface
This support interface acts as an intermediate layer that improves the quality of the model's surface by providing a smooth, even base. Enabling this feature is useful when printing models with visible surfaces, fine details, or smooth curves that require greater precision.
The “Enable support interface” option in Cura allows you to enable or disable the generation of an additional layer between the model and the support structures.
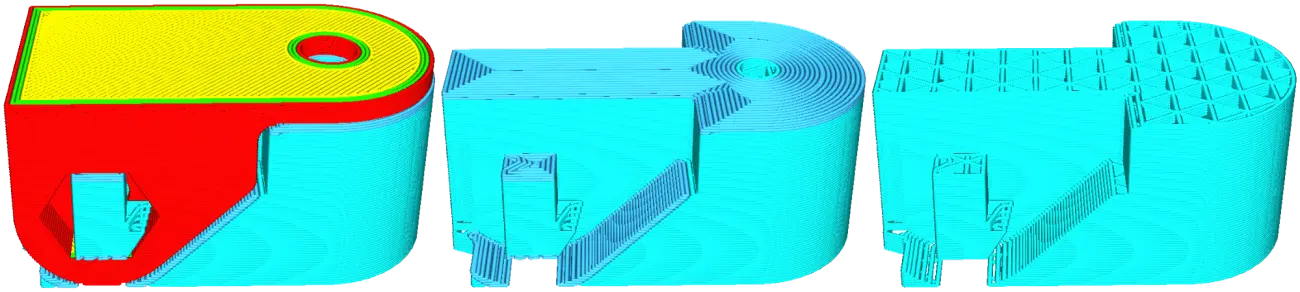
Support ceilings and floors can be configured separately and each has its own options:
Support Interface Thickness
Support interface thickness refers to the setting that determines the thickness of the additional layer generated between the model and the support structures.
Increasing the thickness of the interface creates a stronger, stronger layer that helps improve model stability during printing. On the other hand, a lesser interface thickness will result in a thinner, more discreet layer, ideal for models with delicate details or that require easier support removal.
Support Interface Resolution
Support interface resolution refers to the level of detail and accuracy of the additional layer generated between the model and the support structures.
This setting determines the number of lines or patterns that are created on the interface. A higher resolution will result in a more detailed and accurate interface, which can be beneficial for models with curved surfaces or fine details. However, a lower resolution may be sufficient for simpler models or with less precision requirements.
Support Interface Density
Support interface density refers to the amount of material used to generate the additional layer between the model and the support structures.
Adjusting the interface density allows you to control the amount of material deposited, which affects the strength and stability of the support. Higher density will result in a stronger and stronger interface, while lower density will create a lighter and less visible interface.
Support Soil Density
Support soil density refers to the amount of material used to generate the support layer at the base of the model.
This configuration allows you to control the density and resistance of the support floor to ensure a solid and stable base. Adjusting the support floor density is especially useful when printing a model with a wide or heavy base that requires sturdy support to prevent warping or sagging during printing.
Support Interface Pattern
The support interface pattern refers to the design or arrangement of the lines or patterns generated in the additional layer between the model and the support structures.
Cura offers different pattern options, such as straight lines, zigzags or grids, which affect the appearance and functionality of the interface. The choice of the appropriate pattern will depend on the characteristics of the model and the
Minimum Support Interface Area
The minimum support interface area refers to the minimum size required to generate the additional layer between the model and the support structures.
This setting allows you to set the minimum area threshold that a section of the model must have in order for a support interface to be generated. It is useful to avoid generating interfaces in very small areas or in regions of the model where additional support is not required.
Support Interface Horizontal Expansion
Support interface horizontal expansion refers to the setting that determines the amount of expansion or enlargement that is applied to the interface in the horizontal direction.
This configuration allows control of the amount of material deposited at the interface, which affects its strength and stability. A larger expansion will result in a wider and more solid interface, while a smaller expansion will create a thinner and more discreet interface.
Support Interface Line Addresses
Support interface line directions refer to the setting that establishes the orientation of the lines or patterns generated in the additional layer between the model and the support structures.
Cura offers direction options, such as horizontal, vertical or diagonal, which affect the appearance and functionality of the interface. Choosing the right steering will depend on the characteristics and geometry of the model, as well as your personal preferences.
fan speed alteration
This option gives you control over the fan speed at different stages of printing your media, which can affect quality and appearance.
This configuration allows you to adjust the speed from the fan during printing in support areas.
Adjusting the fan speed can be beneficial to optimize support printing. For example, lowering the fan speed in support areas can reduce vibration and material movement, improving the accuracy and quality of printed support.
On the other hand, increasing the fan speed can speed up the cooling and hardening of the support material, which can be helpful in reducing print time and improving efficiency.
use towers
Enabling this setting allows independent tower structures to be generated to support specific areas of the model during 3D printing. These towers act as support pillars and are strategically placed in places where greater stability is required, such as overhangs or areas with greater weight.
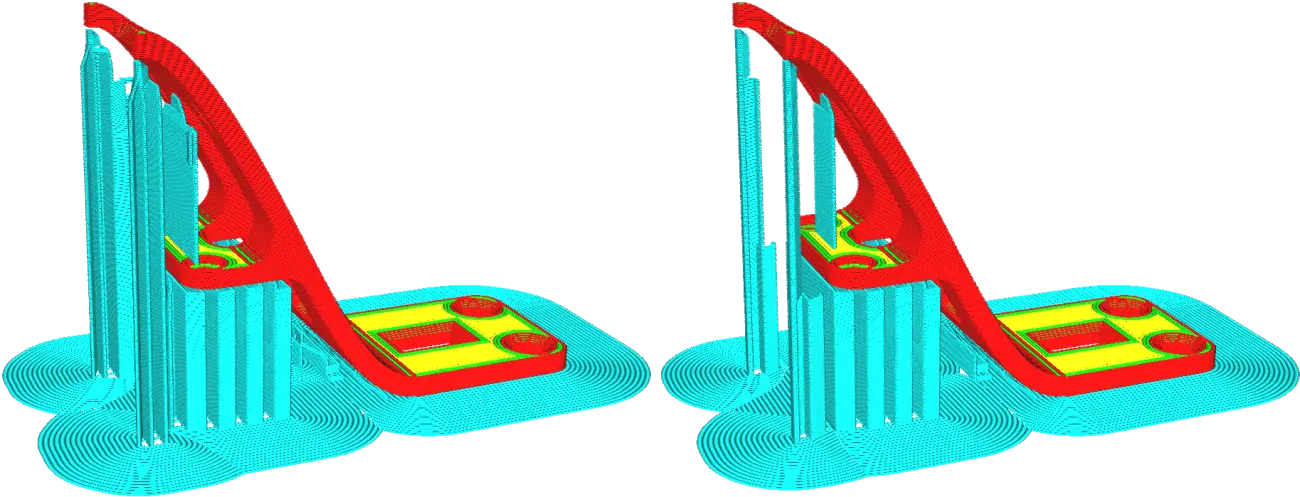
By enabling the “Use Towers” feature, Cura will automatically generate the necessary tower structures to provide additional support in designated areas.
These towers are independent from the rest of the support and can be more easily removed once the print is finished. Additionally, by using towers, the need to build complete support around the model is avoided, which can save material and print time.
tower diameter
This setting controls the diameter of the towers, which are free-standing pillars that are strategically placed in areas of the model that require additional stability.
This configuration determines the size of the structures of the towers generated to provide additional support during 3D printing.
A larger tower diameter will provide a wider, more stable base, ideal for heavier weight areas or to improve the strength of long overhangs. On the other hand, a smaller diameter may be suitable for smaller or more delicate areas that require more discreet support.
Maximum diameter supported by the tower
The maximum diameter supported by the tower in Cura sets the maximum size allowed for tower structures generated during 3D printing.
this option controls the maximum diameter that can have a tower without generating additional support structures.
If a tower exceeds the established maximum diameter, additional support structures will be generated to ensure proper stability and strength of the model during printing.
Tower roof angle
Cura tower roof angle sets the roof pitch of tower structures generated during 3D printing.
This setting controls the tilt angle of the towers roof, which is the top surface that provides additional support to specific areas of the model.

A greater angle will result in steeper tower roofs, which can be beneficial for areas with higher weights or long overhangs. On the other hand, a lesser angle will result in less sloping tower roofs, which may be suitable for smaller or more delicate areas that require more discreet support.
Deployable Support Mesh
By enabling the deployable support mesh option, Cura will generate a mesh-like support network with thinner, more spaced structures, reducing the amount of material used and making it easier to remove support after the print is complete.
It is a configuration that allows generating a support structure in the form of a mesh around the model during 3D printing.
This feature is used to provide lighter, more efficient support in areas that require additional stability.
Deployable Support Mesh is particularly useful on models with complex geometries or intricate features where a traditional support might be difficult to remove or affect the model's surface quality.
The scene has support meshes
This configuration allows to automatically identify and recognize the support meshes in the 3D printing scene.
This feature is especially useful when working with complex models that already include support structures in their design.
By enabling this option, Cura will analyze the print scene for existing support meshes and take these into account when generating additional support structures if necessary.
This means that the software will recognize and respect existing support meshes in the model, avoiding generating additional supports in those areas and optimizing printing efficiency.
This feature is particularly useful when working with models that have been designed with specific supports or have been optimized to print without the need for additional support structures.
By enabling automatic support mesh detection, you can save time and effort by avoiding unnecessary support generation in areas that are already adequately covered.
Also read: Easy to Remove Supports in Cura: Best Settings a post with what I think might be the best support settings in Cura for beginners.
Continue reading about build plate adhesion settings in the following post: Skirt Edge or Balsa What to use in Cure?
Responses