
How to add and configure a 3D filament in Cura

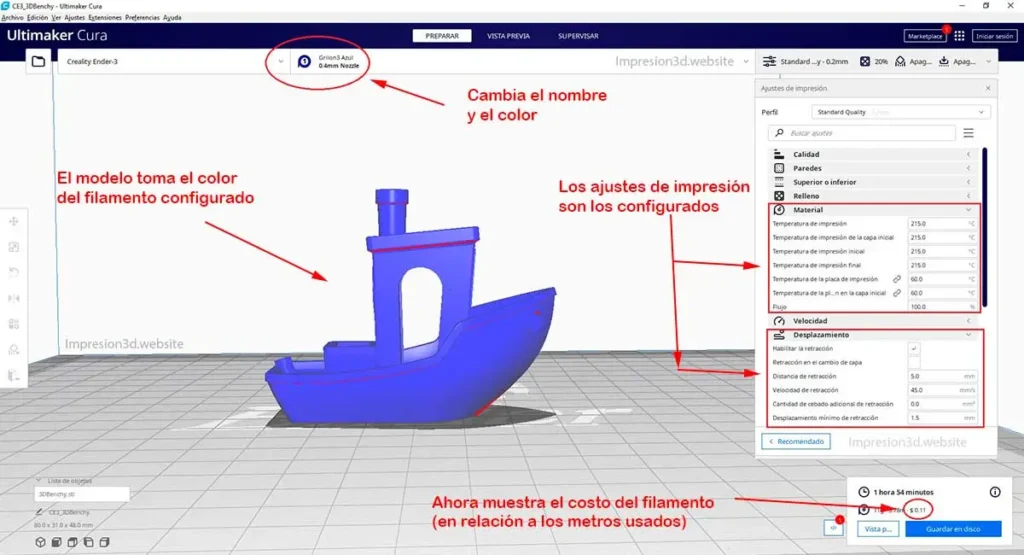
Cura provides us with a list of 3D filament that already come by default in its configurations.
If the filament you use is not on this list you can add it by brand, color, filament type and configure it with the best printing parameters.
You can too set cost per meter of the 3D filament.
To add and configure a new 3D filament in Ultimaker Cura go to: “Preferences” – “Configure Cura…” -“materials” and “create”
This will allow you to add your filament in the cure options, being able to set the best parameters for that filament.
Why add a 3D filament in Cura
Not all brands of filament are the same, nor do they melt at the same temperature.
Therefore, to achieve the best print quality with your printer, it is best to know in depth the filament you use.
For example:
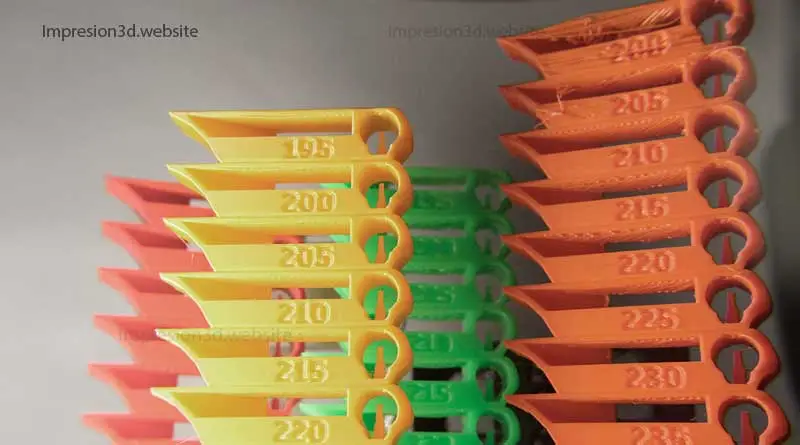
- you can make one temperature tower to know the ideal temperature of the filament.
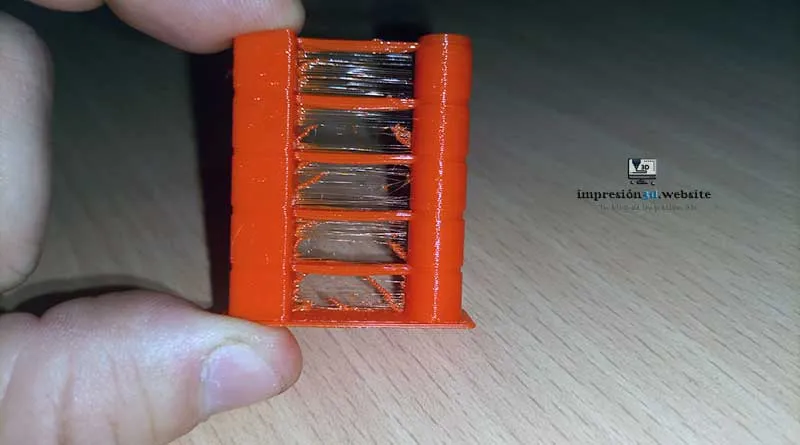
- you can also do shrinkage tests, to see at what distances that filament will begin to leave threads.
- You can tell if that filament is to absorb a lot humidity, to find a way to keep it dry.
- The relationship of cost / quantity of meters according to the manufacturer.
most of You can save this data in Cura, in an independent way for each filament, and access them with just a couple of clicks without having to manually change Cura settings.
The answer is: because you can access the settings of each filament with just a couple of clicks.
How to add and configure a 3D filament in Cura
- Open Cura settings
- Click on Materials and Create
- Configure your filament data
- Set the filament properties
- Configure the Print Settings tab
1) Open Cura settings
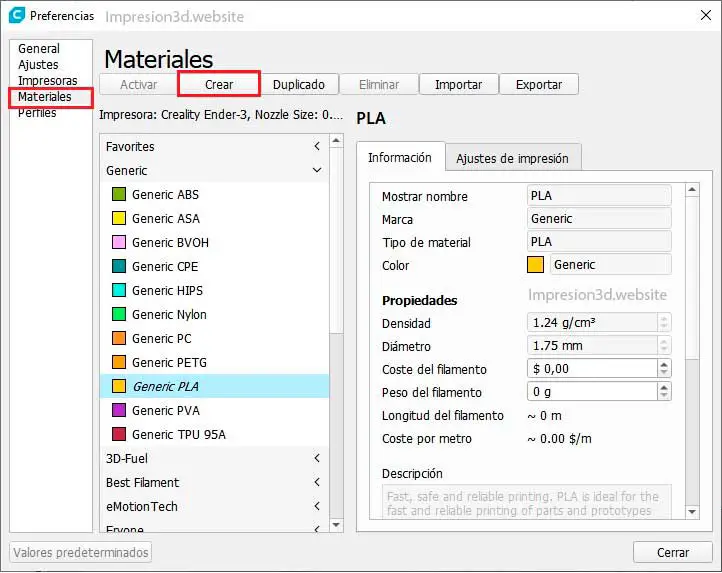
If the brand of 3D filament you use is not in cure, you can add yours by clicking on: “Preferences” – “Configure Cura…” -“materials” and “create”

2) Click on Materials and Create
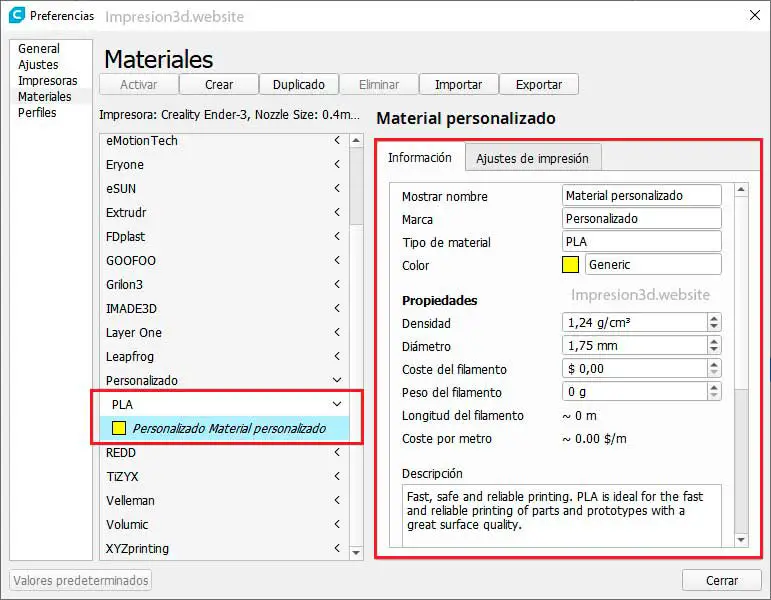
Once the material settings window opens, you click on «create" and it will generate a "new generic filament«.
In the example of the image, this new filament receives the name of "Custom Material", this name can be modified with the data of your filament.
3) Set your filament data
At this point you must configure the data of your filament in the window on the right.
To continue with the example, I am going to configure a blue PLA filament as follows:
- Show name: Here I am going to put the color of the filament (in this case blue)
- Brand: The brand of the filament that you use regularly (For the example I am going to put Grilon3 which is a brand that does not exist in Cura)
- Type of material: Here you have to put the type of filament, if it is PLA or if it is PETG or NYLON or whatever. (I'm going to put PLA)
- Color: Click on the color box and in the next window choose a color similar to your filament. (in my case Blue)
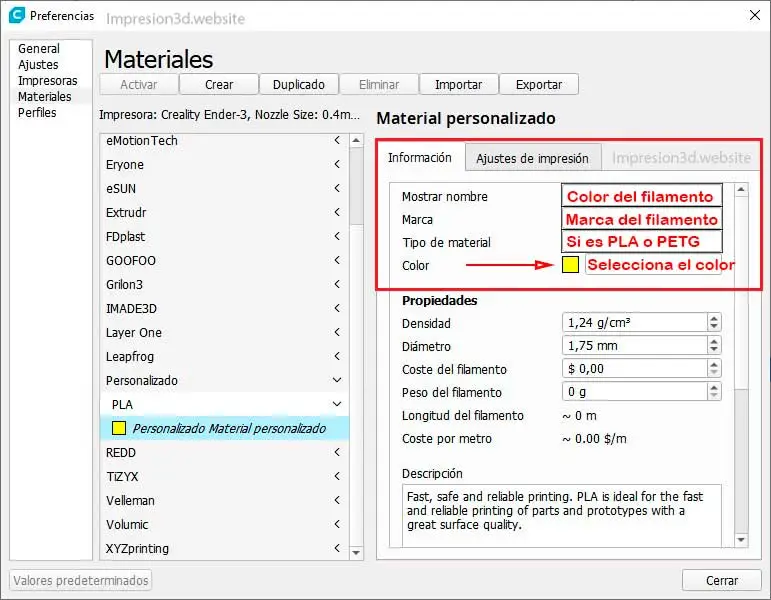
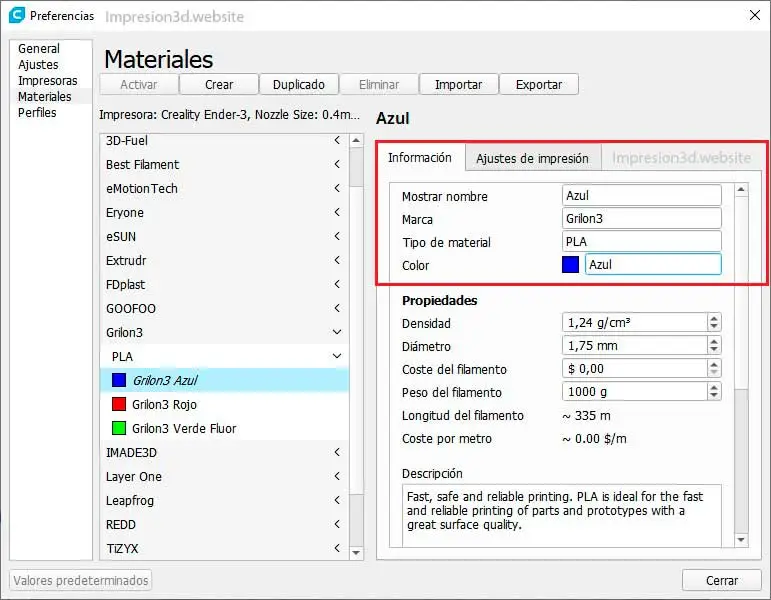
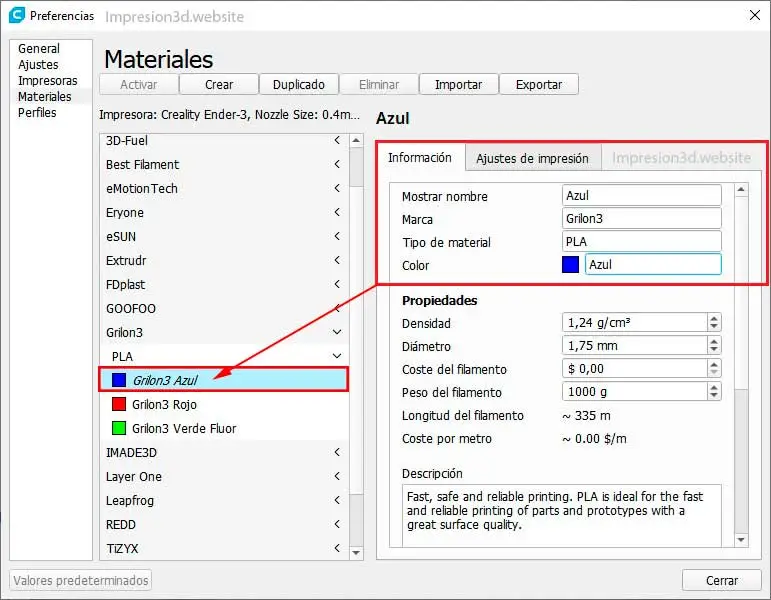
By setting the filament information in the window on the right, it is automatically changed in the window on the Left.
If you add multiple filaments from the same brand, you will be able to find them all in the same “tab” for the brand you configured.
4) Set the filament properties
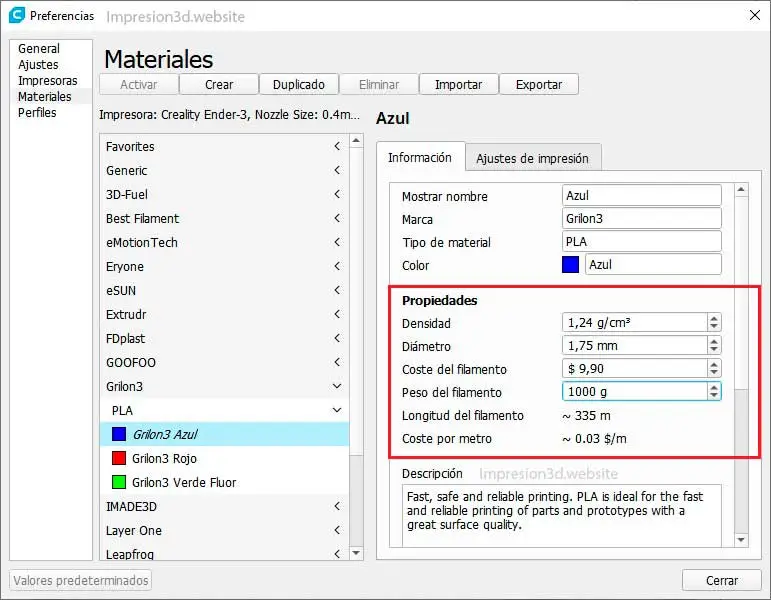
After configuring the "basic information" you can continue configuring the "properties" section below.
In this section you can place the weight of the filament, for example "1000 g" if it is a 1 kilo roll, or "500 g" if it is a half kilo roll.
Another option that can be configured (and that is very good) is to know how much money you are spending with each impression and it is the option of "filament cost"
Continuing with the example it would look like this:
- Density: It remains as is, because it is configured for a 1.75 mm diameter filament (1.24 g/cm3)
- Diameter: It also stays the same because I'm using a 1.75mm filament
- filament cost: Here you are going to put the price of the filament that you are configuring. (for the example I will put $9,90)
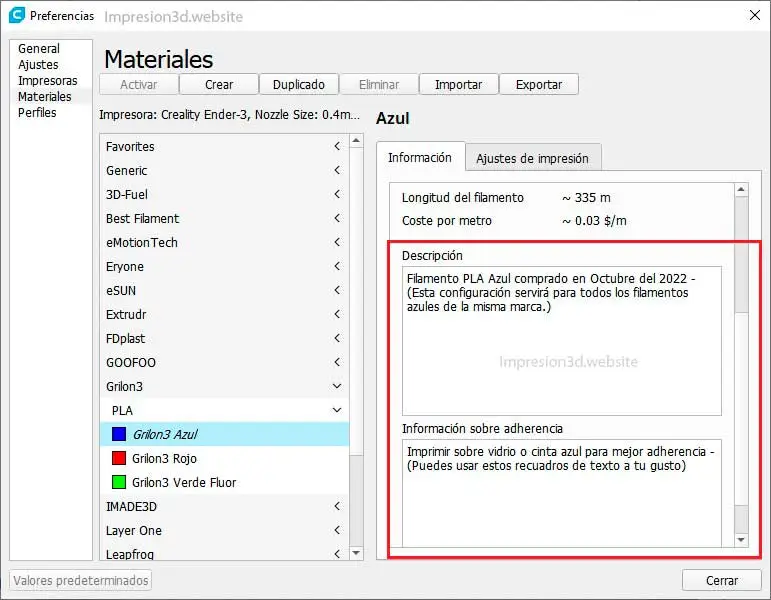
Below you will see two text boxes, where you can write any information you consider important:
- Description: Here you can write any data that you consider relevant about the filament
- Adherence Information: With PLA you shouldn't have sticking problems, but in the case of other filaments, you can use this box to write down any relevant data.
Once you have finished configuring the information tab, you will need to configure tab «print settings«
At this point it becomes important to make a temperature test, to know what is the ideal temperature for your filament, as I mentioned above.
5) Configure the Print Settings tab
In this tab you will configure the filament printing temperatures and the optimal retraction distances for your filament.
In the temperature towers that I made for PLA I found that the printing range that the manufacturer gave me was quite accurate. Even so, I was able to determine that (for that brand), the temperature at which the filament prints best is 215 ° C
Print Settings:
- Default print temperature: Here you have to place the best temperature for your 3D filament (in my case, thanks to the temperature towers, 215° C)
- Default plate temperature: 60°C
- Standby temperature: it can be 180° C (I put 200° C)
- retraction distance: Another very important setting, you must know these values and configure them here. (5.00mm)
- retraction speed: speed at which the filament will retract (45 mm/s)
- fan speed: 100% for PLA
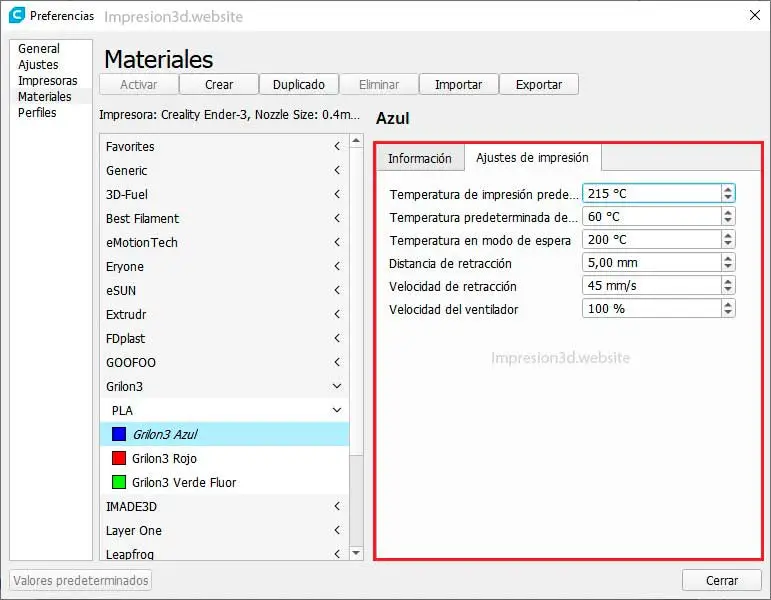
At this point you have finished configuring all the data for your filament. You can close the window.
Now you can check that the filament you configured appears in the upper bar and that the parameters are correct.
When to add and configure a 3D filament in Cura?
Any time you buy a new filament (not in Cura's default filament list) and have done the temperature towers and shrink tests for that filament, you will be able to add it in Cura.
This work will not be in vain, since this data will be saved in Cura and the next time you buy the same filament, it will not be necessary to add it because you will already have it configured.
You will need to do this for each color of filament, of the brand you use.

Hello, I have learned to configure the printing materials in cura thanks to your explanation, but my doubt is that when I create these material profiles and change from one filament to another the temperature, retraction and other parameters that I have configured in the material editor are not changed in the main cura options, how do I do so that when I change the material it changes in the main options to its optimal configuration that I configure in the editor
Hello Juanma! I just checked, (I did the test changing from a PLA filament to a PETG filament of the same brand but with different retraction and temperature settings) and they changed well.
It would be necessary to see if you have configured the settings of all the filaments correctly, and if they have been saved correctly.
It can also happen that if you have a .3mf project open and you change the configuration to one of your saved filaments that you get a message asking if you want to "save or discard" the changes. In that case you would have to put "Discard" so that the changes are applied.
Check again if the temperature and retraction settings were well saved in each filament and then tell me.
Hi Juanma, the same thing happens to me and I can't solve it.
My print settings are not saved for each material I create.
Were you able to find the solution to this problem?
Thanks and regards
Hello! I would like to be able to help you.
What version of cure do you have?